Vehicle Data 🚗
Content: - Quick configuration - Manual configuration - Enable CarQuery - Create the custom fields - How it works
Vehicle Data can be used in a car dealer website, a marketplace or any classifieds website where people can buy and sell cars.
This is a new and important feature because it lets the owners of the websites and their users to list and search for vehicles without having to maintain and update the vehicle information (year, model and make). Also, new cars and models will be automatically available.
Quick configuration
- Login into your Admin Panel.
- Go to Configure -> Settings -> Custom Fields -> Custom fields templates.
- Select Type: Car and choose the categories you want the fields to be applied in the input below. Leave the categories input empty if you want the fields to be applied to all the categories of your website.
- Click Create.
This action will automatically enable CarQuery on Settings -> General -> CarQuery and create all the custom fields related to a car dealer website: forsaleby, adtype, year, make, model, othermake, kilometers, bodytype, transmission, drivetrain, color, fueltype and type.
Manual configuration
Enable CarQuery
- Login into your Admin Panel.
- Go to Configure -> Integrations-> CarQuery.
- Enable CarQuery and click Save.
Create the custom fields
NOTE in latest versions of Yclas the fields are automatically created if they do not exist.
Tip: Name the custom field: year
- Go to Admin Panel -> Configure -> Settings -> Custom Fields.
- Click New Field.
- Enter year in the Name input and in the Type input, choose Select. This is important in order to have the desired functionality.
- Fill the other fields.
- Click Create
Tip: Name the custom field: make
- Go to Admin Panel -> Configure -> Settings -> Custom Fields.
- Press New Field.
- Enter make in the Name input and in the Type input, choose Select. This is important in order to have the desired functionality.
- Fill the other fields.
- Click Create.
Tip: Name the custom field: model
- Go to Admin Panel -> Configure -> Settings -> Custom Fields.
- Press New Field.
- Enter model in the Name input and in the Type input, choose Select. This is important in order to have the desired functionality.
- Click Create.
How it works
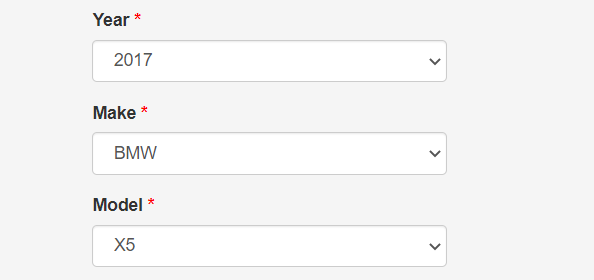
Now CarQuery is enabled and the required fields are created. You, the car dealers/owners or the person who publish the car information will find three dropdown menus in the “publish new” page: “Year”, “Make” and “Model”. First, select a year and then select the manufacturer from the “Make” options.
- Year: when you select a year, the software automatically retrieves the car manufacturers of that year and makes them available in the “Make” dropdown menu.
- Make: select the manufacturer to make all of its models available in the “Model” dropdown menu.
- Model: select the model of the car.